
Setting Up a Flask App and Deploying It Via Google Cloud
before you start make sure you have git and github set up. Git & Github are really important for scaling, managing, and deploying your code. Github webhooks are often used to deploy software.
We will walk through the process of creating a basic Flask application, setting up configurations via an .env file, enabling CORS, and preparing it for deployment to google cloud,
Open your favorite IDE I recommend VScode
python3 -m pip install --user virtualenvthen create your virtual environment. What is virtual environment?
think of it of as a bubble to manage different libraries and versions of libraries it can be useful to run old libraries and ML algorithms in virtual environment that would not be possible to fix in latest version of python.
python -m venv envin the terminal type in ls to list out all objects in directory
lshere you can see our “env” environment.

How to enter python virtual environment? on windows
.\env\Scripts\activatefor MacOS
.\env\Bin\activate
from here you can pip install any library like “pip install Flask”
1. Setting up Your Flask Application
Install Flask using pip:
pip install Flask
Create Your Flask App:

Within this directory, create a file named app.py.

Write your Flask application code in app.py.
from flask import Flask
app = Flask(__name__)

@app.route('/')
def hello():
    return "Hello World!"

if __name__ == '__main__':
    app.run(debug=True)
2. Testing Your Flask Application Locally
Run your Flask application locally to ensure it’s working as expected:
run this command in your terminal.
python app.py
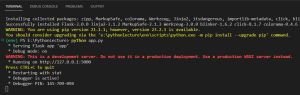
You can ctrl+click “http://127.0.0.1:5000” to open the server on the browser up locally

3. Configuring Environment Variables
its importance of deploying python code and machine learning algorithms is defining and tracking your environmental variables. .env is where the secret keys, database passwords, and API keys exist to be used at server runtime
Install python-dotenv:
pip install python-dotenv
Create a .env file:
In the root of your project directory, create a file named .env and add your configurations:
FLASK_DEBUG=1
So we update app.py code to call environmental variable
dotenv’s functions load_dotenv loads environment variables which are select keys for the server to pass to API to get data or trigger specific behaviour.
import os
from flask import Flask
from dotenv import load_dotenv

# Load environment variables from .env file
load_dotenv()

app = Flask(__name__)

# Configure FLASK_DEBUG from environment variable
app.config['DEBUG'] = os.environ.get('FLASK_DEBUG')

@app.route('/')
def hello():
    return "Hello World!"

if __name__ == '__main__':
    app.run()
we run the flask app locally
python app.py4. Setting up CORS
Install Flask-CORS:
pip install Flask-CORSpip install gunicornupdate the app.py
then CORS class is used to wrap the app object to add CORS headers to all responses from the app
import os
from flask import Flask
from dotenv import load_dotenv
from flask_cors import CORS

# Load environment variables from .env file
load_dotenv()

app = Flask(__name__)
CORS(app)  # Enable CORS for all routes and origins

# Configure FLASK_DEBUG from environment variable
app.config['DEBUG'] = os.environ.get('FLASK_DEBUG')

@app.route('/')
def hello():
    return "Hello World!"

if __name__ == '__main__':
    app.run()
5. Preparing for Deployment
Reference to deploying flask app on cloud run
Create a requirements.txt file:
pip freeze > requirements.txtblinker==1.6.2
click==8.1.7
colorama==0.4.6
flask==3.0.0
importlib-metadata==6.8.0
itsdangerous==2.1.2
Jinja2==3.1.2
MarkupSafe==2.1.3
werkzeug==3.0.0
zipp==3.17.0Create an app.yaml file:
The code snippet in app.yaml is for configuring a Python application on Google Cloud Platform’s App Engine. It sets the runtime environment to Python 3.9 (runtime: python39) and defines the entry point for the application using Gunicorn, a Python web server (entrypoint: gunicorn -b :$PORT app:app).
its for GCP App Engine configuration:
runtime: python39
entrypoint: gunicorn -b :$PORT app:app
This means Gunicorn will start the application (app:app indicates the Python module and app instance) and listen on a port specified by the App Engine environment (:$PORT). This configuration is essential for deploying and running Python web applications on App Engine.
Create Dockerfile:
When you make a dockerfile make sure its upper case Dockerfile
# Dockerfile
FROM python:3.9.17-bookworm
# Allow statements and log messages to immediately appear in the logs
ENV PYTHONUNBUFFERED True
# Copy local code to the container image.
ENV APP_HOME /back-end
WORKDIR $APP_HOME
COPY . ./

RUN pip install --no-cache-dir --upgrade pip
RUN pip install --no-cache-dir -r requirements.txt

# Run the web service on container startup. Here we use the gunicorn
# webserver, with one worker process and 8 threads.
# For environments with multiple CPU cores, increase the number of workers
# to be equal to the cores available.
# Timeout is set to 0 to disable the timeouts of the workers to allow Cloud Run to handle instance scaling.
CMD exec gunicorn --bind :$PORT --workers 1 --threads 8 --timeout 0 app:app
Create a “.dockerignore” file and add this code to ignore deployment and set up files
Dockerfile
README.md
*.pyc
*.pyo
*.pyd
__pycache__
.pytest_cache
Now that you have prepared the flask app for deployment we can deploy it on to google cloud in our next section.
[…] Now you cannot do this step if you have not prepared your flask app for deployment so please go through the previous step before this one or it will not work. […]
[…] After creating your github repo we can start building our Flask App in the next session […]