
Rapid Prototype Development: From Idea to Deployment for AI & ML
Welcome students or self-taught learns, thank you for coming to read this article. You are here because you have a lot of grit, awareness, cleverness, energy, & time to build something of value for others and yourself. However, as you know today, there are so many cutting edge technologies, such as chat-gpt, that are putting real competitive pressures on your job prospects as computer scientist, data science, or software engineer. How you have been taught is wrong for the job market, its great for helping you think critically. Although In today’s job market where everyone, or anyone can have a computer science degree or those who are experienced + degree are being layoff are saturating the market.
That is why you should prototype.
One way to make yourself competitive for the job market is to do a Prototype.
Not a project, that is not copy of something before or already existed, instead creating something that brings value to a community/customers/users as a whole. The best software engineers I met understand one thing that is value is found in the user. and they ask What do users value? if you have the ability to show empathy for users that makes you stand out of the crowd. Making something useful that someone will actually used and that is deploy can be accessible by users that is a prototype.
it has to be useful.
If you are a college student your opportunity is right in front of you, some students come up with great ideas but will never execute on that idea, that is a mistake. You have to make it real! if you want to succeed for your career or a start up its simple Launch now! and Build the Thing! [1]
I developed this as a full stack tutorial and step by step originally for the Nittany AI Alliance to help Penn State students to create prototype for their customers. You can access the full code here.
You should be able to code a full stack application up in less than a day and get into rhythm of continuous deployment for you MVP or prototype. That any idea you have can become reality in less than week depending on your problem of course.
Prerequisites
• Install Python
• Install Git
• Create a Google account & Google cloud account apply for credits.
• Create a Github account.
• Create a Supabase account for database.
• Install VScode
• Add python app on VScode
• Add indent-rainbow on VScode
Part 1. Table of Content
Part 1. is coded in python why? Python is a language that scales with people, that can be translated into other languages, that can be extended with libraries easily with sci-kitlearn, payment workflow stripe, access supercomputers, access quantum computers, and many API across the world. All with python.
- Create a Github Repo
- Setting Up a Flask App for Deployment
- Deploying It Via Google Cloud CLI
- Call Alpha Advantage API GET Data past it to Monte Carlo.
- Adding the Machine Learning Module (Monte Carlo) or the Deep Learning Module.
- Call Machine Learning Module in Flask with template & input box.
- Data and store the results in Supabase as a cloud-based backend to store & retrieve data.
- Deploy the Flask App
Create a Github Repo
We are going login into to your github account

In the upper right click it and click “Your Repositories”

Click New button

Fill out the form and click create

How to use git
Git is a widely-used version control system designed to handle everything from small to very large projects with speed and efficiency. The process typically starts with git add, which stages changes you’ve made to files in your working directory for a commit. This step doesn’t yet record the changes; it simply marks them for inclusion in the next commit. Then, git commit is used to actually commit the staged changes. This creates a snapshot of your project, allowing you to save or share the current state of your code. After committing, you can use git push to upload your local repository content to a remote repository.

https://reddit.com/r/git/comments/99ul9f/git_workflow_diagram_showcasing_the_role_of/
This is often used to share your changes with others or to backup your work on a remote server. Conversely, git pull is used to fetch and integrate changes from a remote repository into your local repository. This command is a combination of git fetch, which retrieves changes from a remote repository, and git merge, which merges these changes into your current branch. In summary, Git provides a robust framework for tracking and collaborating on software development projects, streamlining the process of managing changes and ensuring consistency and integrity of cod
Open Up VScode, Open Up a folder, and open up the terminal.
git clone https://github.com/Gresliebear/rapid-prototype.git
We are going edit the README.md file
hello worldwe going to add our file to git staging
git add .
then check status
git check status
we going commit our code to git
git commit -m "first commit"
then we push it to repo
git push
and if you are team of the repo you pull their code to get the latest update
git pull
Setting Up a Flask App and Deploying It Via Google Cloud
We will walk through the process of creating a basic Flask application, setting up configurations via an .env file, enabling CORS, and deploying the app to Google Cloud Platform (GCP).
Open your favorite IDE I recommend VScode
python3 -m pip install --user virtualenvthen create your virtual environment. What is virtual environment?
think of it of as a bubble to manage different libraries and versions of libraries it can be useful to run old libraries and ML algorithms in virtual environment that would not be possible to fix in latest version of python.
python -m venv envin the terminal type in ls to list out all objects in directory
lshere you can see our “env” environment.

How to enter python virtual environment? on windows
.\env\Scripts\activatefor MacOS
.\env\Bin\activate
from here you can pip install any library like “pip install Flask”
1. Setting up Your Flask Application
Install Flask using pip:
pip install Flask
Create Your Flask App:

Within this directory, create a file named app.py.

Write your Flask application code in app.py.
from flask import Flask
app = Flask(__name__)

@app.route('/')
def hello():
    return "Hello World!"

if __name__ == '__main__':
    app.run(debug=True)
2. Testing Your Flask Application Locally
Run your Flask application locally to ensure it’s working as expected:
run this command in your terminal.
python app.py
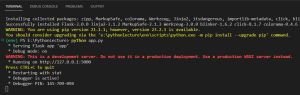
You can ctrl+click “http://127.0.0.1:5000” to open the server on the browser up locally

3. Configuring Environment Variables
its importance of deploying python code and machine learning algorithms is defining and tracking your environmental variables. .env is where the secret keys, database passwords, and API keys exist to be used at server runtime
Install python-dotenv:
pip install python-dotenv
Create a .env file:
In the root of your project directory, create a file named .env and add your configurations:
FLASK_DEBUG=1
So we update app.py code to call environmental variable
dotenv’s functions load_dotenv loads environment variables which are select keys for the server to pass to API to get data or trigger specific behaviour.
import os
from flask import Flask
from dotenv import load_dotenv

# Load environment variables from .env file
load_dotenv()

app = Flask(__name__)

# Configure FLASK_DEBUG from environment variable
app.config['DEBUG'] = os.environ.get('FLASK_DEBUG')

@app.route('/')
def hello():
    return "Hello World!"

if __name__ == '__main__':
    app.run()
we run the flask app locally
python app.py4. Setting up CORS
Install Flask-CORS:
pip install Flask-CORSpip install gunicornupdate the app.py
then CORS class is used to wrap the app object to add CORS headers to all responses from the app
import os
from flask import Flask
from dotenv import load_dotenv
from flask_cors import CORS

# Load environment variables from .env file
load_dotenv()

app = Flask(__name__)
CORS(app)  # Enable CORS for all routes and origins

# Configure FLASK_DEBUG from environment variable
app.config['DEBUG'] = os.environ.get('FLASK_DEBUG')

@app.route('/')
def hello():
    return "Hello World!"

if __name__ == '__main__':
    app.run()
5. Preparing for Deployment
Create a requirements.txt file:
pip freeze > requirements.txtblinker==1.6.2
click==8.1.7
colorama==0.4.6
flask==3.0.0
importlib-metadata==6.8.0
itsdangerous==2.1.2
Jinja2==3.1.2
MarkupSafe==2.1.3
werkzeug==3.0.0
zipp==3.17.0Create an app.yaml file:
The code snippet in app.yaml is for configuring a Python application on Google Cloud Platform’s App Engine. It sets the runtime environment to Python 3.9 (runtime: python39) and defines the entry point for the application using Gunicorn, a Python web server (entrypoint: gunicorn -b :$PORT app:app).
its for GCP App Engine configuration:
runtime: python39
entrypoint: gunicorn -b :$PORT app:app
This means Gunicorn will start the application (app:app indicates the Python module and app instance) and listen on a port specified by the App Engine environment (:$PORT). This configuration is essential for deploying and running Python web applications on App Engine.
Create Dockerfile:
When you make a dockerfile make sure its upper case Dockerfile
# Dockerfile
FROM python:3.9.17-bookworm
# Allow statements and log messages to immediately appear in the logs
ENV PYTHONUNBUFFERED True
# Copy local code to the container image.
ENV APP_HOME /back-end
WORKDIR $APP_HOME
COPY . ./

RUN pip install --no-cache-dir --upgrade pip
RUN pip install --no-cache-dir -r requirements.txt

# Run the web service on container startup. Here we use the gunicorn
# webserver, with one worker process and 8 threads.
# For environments with multiple CPU cores, increase the number of workers
# to be equal to the cores available.
# Timeout is set to 0 to disable the timeouts of the workers to allow Cloud Run to handle instance scaling.
CMD exec gunicorn --bind :$PORT --workers 1 --threads 8 --timeout 0 app:app
Create a “.dockerignore” file and add this code to ignore deployment and set up files
Dockerfile
README.md
*.pyc
*.pyo
*.pyd
__pycache__
.pytest_cache
6. Deploying to Google Cloud Platform
Set up GCP:
Create a Google Cloud Platform account if you do not have one.
Create a new project in the GCP Console.
You will click the dropdown in the upper left

A modal will appear and you select the “NEW PROJECT”

which will redirect you to page in which you will write the name your project name.

Then you will click “create” button
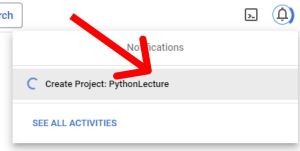
it will be shown in the upper right with creation in process and click and it will take you a dashboard

Now go to google cloud CLI or SDK to install the google SDK it will install version of python.

you will click the executable for googlecloudsdk

it will ask you stuff like get feedback on its cli you can just click next and ignore it

then terms and services click next

select a harddrive to download

then click install

let installation proceed

then go to the terminal and try
gcloud helpyou should see this below

Authenticate with GCP using the SDK.
when you gcloud init it will ask you through authentication steps
gcloud init
run this will initiate the gcloud cli to ask you for authentication details and configuration
gcloud initit will ask for details of which project you defaulted here I have to redo the configuration for the lecture series

So I select 2 as the option we creates a new configuration file called lecture1 I typed in. So google cloud CLI will use this for my deployment calls in the terminal

Now it wants to know which account will use this configuration I chose my email lesliemwubbel@gmail.com

After that step you will need to select a project here I select 6 because this the pythonlecture series

Deploy Your App:
Deploy your app using the gcloud command-line tool.
gcloud run deploy --source .it will spin up CPU service and it will ask you to name it. I named it lecture.

Then it will ask to deploy the server in specific region of the word I just chose the east coast or us-east4 because its closer to me.

it will ask “Allow unauthenticated invocations to [lecture] (y/N)?” I say yes

after that will go through a series of checks and spinning up containers and running your dockerfile

Here’s a ERROR! well its on purpose because I left important step out on my own to show what error looks and how to find the bugs/logs “pip freeze > requirements.txt”
if you click the hyperlink provided in the terminal this will take you to google cloud to see deploy log and see what specific broke this will help you debug issues or detect problematic libraries breaking the installation.

requirements.txt is set of libraries python will follow to install on deployment so its exactly the same as on your local machine.

Now it works! it deployed

Access Your App:
Once the deployment is successful, you can access your app via the provided URL.
it generate url like this
https://lecture-7olbxwuy7a-uk.a.run.app/
You should see “Hello World”
You can spin the server down by cli
gcloud run services delete lecture-00005-rij --region=us-east4or
of course the UX is terrible and google makes hard to find what containers you have running so to see that go to this url https://console.cloud.google.com/run
it should load the containers you are running

7. Monitoring and Managing Your App
Use the GCP Console to monitor the performance of your app, view logs, and manage versions.

Call Alpha Vantage API GET Data past it to Monte Carlo.
Alright now that we add our model to backend and we call model call to flask app we need to make sure we can get data from API. I will use Alpha Vantage as example and you can watch this video to get step by step on API calls
So first we’re going need to install some libraries
pip install alpha-vantagepip install pandas
Write folder called test_code and create python file called api_call_test.py.
now put this code its a small snippet of code that calls the Alpha API with API. Replace the API_KEY variable below where it says INSERT KEY HERE by with your own free API KEY at Alpha Vantage
https://www.alphavantage.co/support/#api-key
from alpha_vantage.timeseries import TimeSeries
import requests
import json
from pandas import json_normalize
import pandas as pd

# must be system path
statement='Invalid API call. Please retry or visit the documentation (https://www.alphavantage.co/documentation/) for TIME_SERIES_MONTHLY_ADJUSTED.'
def time_series_fun_monthly(key, ticker):
    """
    key - API key from aplhavantage
    list_of_tickers = [] list only

    return dataframe
    """

    url = 'https://www.alphavantage.co/query?function=TIME_SERIES_MONTHLY_ADJUSTED&symbol={}&apikey={}'.format(ticker, key)
    print(url)
    # url = 'https://www.alphavantage.co/query?function=TIME_SERIES_DAILY_ADJUSTED&symbol=IBM&outputsize=full&apikey=demo&datatype=csv'
    response = requests.get(url)

    if response.status_code == 200:
        print ('response worked!')
    else:
        print ('response failed!')

    response_dict = response.json()
    # print(response_dict)
    try:
        if response_dict['Error Message'] == statement:
            return "Ticker is invalid said Alpha"
    except:
        "pass"
    ## validation code
    try:
        _, header= response.json()
    except:
        print("failed")
        return "failed"
    #Convert to pandas dataframe
    df = pd.DataFrame.from_dict(response_dict[header], orient='index')
    #Clean up column names
    df_cols = [i.split(' ')[1] for i in df.columns]
    df.columns = df_cols
    df = df.reset_index(0)
    df.rename(columns = {'index':'Date'}, inplace = True)

    return df

# Calling & testing the function pass in your API_KEY
API_KEY = 'INSERT KEY'
df = time_series_fun_monthly(API_KEY, 'IBM')

print(df)
You should see pandas data frame printed to show stock prices out

Now we going take our test code and generalize it for the flask app by creating a folder called services this where our API call will live.

We create new python script call api_calls.py and place our test code inside
from alpha_vantage.timeseries import TimeSeries
import requests
import json
from pandas import json_normalize
import pandas as pd

def time_series_fun_monthly(key, ticker):
    """
    key - API key from aplhavantage
    list_of_tickers = [] list only

    return dataframe
    """

    url = 'https://www.alphavantage.co/query?function=TIME_SERIES_MONTHLY_ADJUSTED&symbol={}&apikey={}'.format(ticker, key)
    print(url)
    # url = 'https://www.alphavantage.co/query?function=TIME_SERIES_DAILY_ADJUSTED&symbol=IBM&outputsize=full&apikey=demo&datatype=csv'
    response = requests.get(url)

    if response.status_code == 200:
        print ('response worked!')
    else:
        print ('response failed!')

    response_dict = response.json()
    # print(response_dict)
    try:
        if response_dict['Error Message'] == statement:
            return "Ticker is invalid said Alpha"
    except:
        "pass"
    ## validation code
    try:
        _, header= response.json()
    except:
        print("failed")
        return "failed"
    #Convert to pandas dataframe
    df = pd.DataFrame.from_dict(response_dict[header], orient='index')
    #Clean up column names
    df_cols = [i.split(' ')[1] for i in df.columns]
    df.columns = df_cols
    df = df.reset_index(0)
    df.rename(columns = {'index':'Date'}, inplace = True)

    return df
The API_KEY are never shared publicly this why we have to pass the keys as secrets from our .env file so the way to do that we will need update the app.py
Test Monte Carlo Simulation with the API data
There are many examples of Monte Carlo Simulation its well used algorithm it can used more for than just stock prices.
- https://medium.com/analytics-vidhya/monte-carlo-simulations-for-predicting-stock-prices-python-a64f53585662
- https://medium.com/illumination/predicting-stock-prices-using-monte-carlo-methods-in-python-2b099c408162
- https://www.youtube.com/watch?v=6-dhdMDiYWQ
Now we need to test & show you the machine learning model were deploying. create file called test_model.py
from api_call_test import time_series_fun_monthly
import numpy as np
import pandas as pd


def calculate_dca_return(stock_data, monthly_investment, months_to_invest):
    """
    Dollar Cost Averaging (DCA) Monte Carlo Sitmulation Implementation
    Invest $1000 per month in ETF. Once every month, randomly choose one day to purchase the maximum number of shares allowed with available buying power
    Calculate the return of dollar-cost averaging on a stock.

    Parameters:
    stock_data (DataFrame): Historical stock data.
    monthly_investment (float): Amount invested each month.
    months_to_invest (int): Number of months over which investments are made.

    Returns:
    float: ROI (Return on Investment)
    """
    # Ensure 'Date' column is in datetime format
    stock_data['Date'] = pd.to_datetime(stock_data['Date'])

    # Generate a range of dates for analysis
    start_date = stock_data['Date'].min()
    end_date = stock_data['Date'].max() - pd.DateOffset(months=months_to_invest)
    date_range = pd.date_range(start=start_date, end=end_date, freq='M')

    # Randomly select a start month for investing
    invest_start_date = np.random.choice(date_range)

    # Initialize investment tracking variables
    total_investment = 0
    total_value = 0
    shares_owned = 0

    # Loop over each month to calculate investment progress
    for month_count in range(months_to_invest):
        current_date = invest_start_date + pd.DateOffset(months=month_count)
        current_stock_data = stock_data[stock_data['Date'].dt.to_period('M') == current_date.to_period('M')]

        if not current_stock_data.empty:
            # Randomly select a trading day in the month
            random_trading_day = current_stock_data.sample()

            # Get closing price and calculate number of shares bought
            closing_price = float(random_trading_day['close'].iloc[0])
            shares_bought = monthly_investment / closing_price

            # Update investment totals
            total_investment += monthly_investment
            shares_owned += shares_bought
            total_value = shares_owned * closing_price

    # Calculate ROI
    roi = (total_value - total_investment) / total_investment

    return roi


def apply_model(stock_data, num_iter, dollars, num_months):
    # dca_simulation SPY 12-month simulation
    num_iter = num_iter
    stock_data = stock_data
    # ticker_string = 'test SPY'
    dollars = float(dollars)
    num_months = int(num_months)
    ticker_sim_dat = []

    for k in range(num_iter):
        # caluations for simulation
        x = calculate_dca_return(stock_data, dollars, num_months)
        ticker_sim_dat.append(100*x)
        # print("iterating", k)

    return ticker_sim_dat

from api_call_test import time_series_fun_monthly

API_KEY = 'D03VFL5XJ25QWELA'
TICKER = 'AAPL'
df = time_series_fun_monthly(API_KEY, TICKER)

# monte carlo iterations
num_iter = 1000
# $1000 dollars
amountForDCA = 1000
#time line 12 months
months = 12

simulation_data  = apply_model(df, num_iter, amountForDCA, months)

print(simulation_data)

## lets plot the data
import matplotlib.pyplot as plt
ticker_hist = plt.hist(simulation_data,bins='auto')
plt.title(TICKER + '' + str(months) + '-month ROI Simulation (' + str(num_iter) + ' Iterations)')
plt.xlabel(str(months) + '-month return (%)')
plt.ylabel('Iterations')
plt.xlim([-40,30])
plt.show()
when you run the script you should get this model
python test_model.py
You app.py should look like this, we rewrite it so we have two routes or two endpoints for the front-end later
API_KEY = os.environ.get("API_KEY")

@app.route("/")
def hello():

    return render_template('index.html')

@app.route("/call-model", methods=['POST'])
def call_model_route():
    form_data = request.form
    model_result = call_model(API_KEY, form_data)

    return "Test"

if __name__ == "__main__":
    app.run()
Adding the Machine Learning Module or the Deep Learning Module
So for this part I have taken some jupyter notebook code or add my trained model, & generalized into function call here Add Machine Learning Module (Monte Carlo simulation).
Create a models folder

Inside of the models folder we will create a models folder where we will create python file that will be our module for calling our machine learning algorithms, tensorflow trained models, or other statistical tools
For example in this code we have preprocessing data step before passing data to our model to ensure it can handle unusually use cases then the tensorflow model is called on the flask app server to run on the data and return the results which we can save to the database.

we will import out libraries
import tensorflow as tf
import pandas as pd
import numpy as np
don’t for get to pip install libraries
pip install tensorflow
pip install pandas
pip install numpy
then pip freeze your library because when you deploy your flask app again at the end you want to make sure your prototype is installing the right libraries on deployment server.
pip freeze > requirements.txt
First we are going create one function that calls with 3 other functions.
As I explained before this call_model function is going just ETL our
Preprocess –> Model –> Load results
def call_model(data):
    # Step 1: Preprocess the messy data
    data_for_model = load_and_preprocess_data(data)

    # Step 2: we load model and predict & rearrange the data
    new_results = apply_model(data_for_model)

    # Step 3: Save the organized data to data base
    output_file_path = r'E:\NittanyAI Projects\Nittany-AI-Rapid-Prototyping-Code\back-end-prototype\results'
    save_data(new_results, output_file_path)
Your python file should look like this

This call_model will be called in our flask app route Hello World every time someone hits the endpoint we will call model to run on the google cloud server.
Your app.py file should look like this
import os
from flask import Flask
from dotenv import load_dotenv
from flask_cors import CORS

from models.model_call import call_model

#Load environment variables
load_dotenv()

# Initialize Flask App
app = Flask(__name__)
# then CORS class is used to wrap the app object to add  CORS headers to all responses from the app
CORS(app)

app.config['DEBUG'] = os.environ.get('DEBUG')

@app.route('/')
def hello(data):
    # here we can past inputs from the frontend to our model

    model_result = call_model(data)

    return "Hello World!"

if __name__ == '__main__':
    app.run(debug=True)
You can see that we are calling the function call_model on our endpoint
Now we need to write the other 3 functions above that will handle our ETL. Entry Transform Load process. Functions
- load_and_preprocess_data
- apply_model
- save_data
Load & Preprocess data function
Then we add our Load_and_preprocess_data(data): function
def load_and_preprocess_data(data):
    # Load the data
    return data  # assuming coords is the preprocessed data
inside our load_and_preprocess_data(data): function we can load data, edit so it fits the models parameters correctly, or make API calls. we going call the Alpha Advantage API and structure our data later on. so we will can back and fill in that later.
You should see the file as this

Apply Model Function
Use the Monte Carlo simulation for the tutorial other code snippets are just examples
In this function apply_model we can load a already trained tensorflow model for example below this what that looks like. We call tensorflow library and its class tf to load the model.h5. Model Format: The .h5 extension indicates that the file is stored in the HDF5 (Hierarchical Data Format version 5) format. HDF5 is a data model, library, and file format for storing and managing data, and it’s widely used for handling large amounts of data and complex data objects.
def apply_model(data_for_model, model_path='my_model.h5'):
    # Load the model
    model = tf.keras.models.load_model(model_path)

    # Get the new coordinates from the model
    new_results = model.predict(data_for_model)

    return new_results
Or call machine learning algorithms like K-means learns. to get access to latest python machine learning algorithms I would check sci-kitlearn library
def apply_model(data, num_clusters):
    """
    Applies k-means clustering to the given data using the specified number of clusters.

    Parameters:
    data (array-like): The data to be clustered.
    num_clusters (int): The number of clusters to form.

    Returns:
    array: The cluster labels for each data point.
    """
    kmeans = KMeans(n_clusters=num_clusters, random_state=0)
    kmeans.fit(data)
    return kmeans.labels_
For the step by step were going to use Monte Carlo simulation to predict Dollar Cost Averaging into specific stocks. Monte Carlo Simulation can be apply to many problems is a computational technique that uses random sampling to approximate complex mathematical or physical systems.
Here model scenarios of stock price movement with significant uncertainty and predict outcomes by simulating many different possible situations.
Here’s a metaphor to explain it easier:
Imagine a vast forest with countless paths, each leading to different destinations. A Monte Carlo simulation is like sending out a swarm of birds to explore these paths, each bird choosing a route at random. By observing where most birds gather, we can predict the most likely destination, despite the complexity and multitude of possible paths.
So we will need to have two functions every time Monte Carlo Simulation ireates in the loop we have to calculate dca return as a “possibility”.
def apply_model(stock_data, num_iter, dollars, num_months):
    # dca_simulation SPY 12-month simulation
    stock_data = stock_data
    num_iter = int(num_iter)
    dollars = float(dollars)
    num_months = int(num_months)
    ticker_sim_dat = []

    for k in range(num_iter):
        # caluations for simulation
        x = calculate_dca_return(stock_data, dollars, num_months)
        ticker_sim_dat.append(100*x)
        # print("iterating", k)

    return ticker_sim_dat
So everytime the Monte Carlo Simulation iterates it has to calculate a possible return for DCA.
def calculate_dca_return(stock_data, monthly_investment, months_to_invest):
    """
    Dollar Cost Averaging (DCA) Monte Carlo Simulation Implementation
    Invest $1000 per month in ETF. Once every month, randomly choose one day to purchase the maximum number of shares allowed with available buying power
    Calculate the return of dollar-cost averaging on a stock.

    Parameters:
    stock_data (DataFrame): Historical stock data.
    monthly_investment (float): Amount invested each month.
    months_to_invest (int): Number of months over which investments are made.

    Returns:
    float: ROI (Return on Investment)
    """
    # Ensure 'Date' column is in datetime format
    stock_data['Date'] = pd.to_datetime(stock_data['Date'])

    # Generate a range of dates for analysis
    start_date = stock_data['Date'].min()
    end_date = stock_data['Date'].max() - pd.DateOffset(months=months_to_invest)
    date_range = pd.date_range(start=start_date, end=end_date, freq='M')

    # Randomly select a start month for investing
    invest_start_date = np.random.choice(date_range)

    # Initialize investment tracking variables
    total_investment = 0
    total_value = 0
    shares_owned = 0

    # Loop over each month to calculate investment progress
    for month_count in range(months_to_invest):
        current_date = invest_start_date + pd.DateOffset(months=month_count)
        current_stock_data = stock_data[stock_data['Date'].dt.to_period('M') == current_date.to_period('M')]

        if not current_stock_data.empty:
            # Randomly select a trading day in the month
            random_trading_day = current_stock_data.sample()

            # Get closing price and calculate number of shares bought
            closing_price = float(random_trading_day['close'].iloc[0])
            shares_bought = monthly_investment / closing_price

            # Update investment totals
            total_investment += monthly_investment
            shares_owned += shares_bought
            total_value = shares_owned * closing_price

    # Calculate ROI
    roi = (total_value - total_investment) / total_investment

    return roi
Save data
Now we have function after model runs to structure our data past back to the flask app which will pass it to the front-end
def save_data(organized_data, output_file_path):
    with pd.ExcelWriter(output_file_path) as writer:
        organized_data.to_excel(writer)
    print("successfully saved")
So your code model_call.py should like this what’s in this paste bin
You app.py should look like this right now were going past the API_KEY to model_call.py functions.
API_KEY = os.environ.get('API_KEY')

@app.route('/')
def hello(data):
    # here we can past inputs from the frontend to our model

    model_result = call_model(API_KEY, data)
    print(model_result)

    return "Hello World!"

if __name__ == '__main__':
    app.run(debug=True)
As you notice that load_and_preprocess function has new parameters API_KEY. That means we will need to update the call_model functions by adding new parameter API_KEY. call model function call should l ike this below, where were passing a API_KEY
def call_model(API_KEY, data):
    # Step 1: Preprocess the messy data
    data_for_model = load_and_preprocess_data(API_KEY, data)

    # Step 2: we load model and predict & rearrage the data
    new_results = apply_model(data_for_model)

    # Step 3: Save the organized data to data base
    output_file_path = r'E:\NittanyAI Projects\Nittany-AI-Rapid-Prototyping-Code\back-end-prototype\results'
    save_data(new_results, output_file_path)
back in the load_and_process_data function under the python script called model_call.py we place our test code
def load_and_preprocess_data(data):
    # Load the data
    return data  # assuming coords is the preprocessed data
Should now be by calling the time_series_fun_monthly
from services.api_calls import time_series_fun_monthly

def load_and_preprocess_data(API_KEY, data):
    # Load the data
    ticker = data['ticker']
    data = time_series_fun_monthly(API_KEY, ticker)
    return data  # assuming coords is the preprocessed data
Creating some test inputs for the flask app
What does this mean? Well for our Monte Carlo Simulation we have four major inputs
- ticker
- Number of Iterations
- Dollars
- Number of months
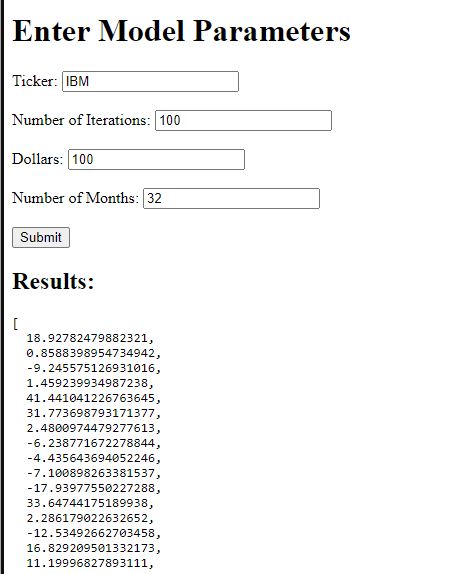
We will need to write app.py to load a html page like this one

and new endpoint we can create as many endpoints as we like but for every endpoint API call or hit called will cost small amounts of money.
So we will rewrite our route hello to render template and new endpoint called /call-model.
@app.route('/')
def hello():
    # here we can past inputs from the frontend to our model
    return render_template('index.html')

@app.route('/call-model', methods=['POST'])
def call_model_route():
    form_data = request.form
    print(form_data['ticker'])

    # Your logic here, using the form values
    model_result = call_model(API_KEY, form_data)

    return jsonify(model_result)
first We need to create templates folder and write html for inputs and javascript to handle logic when we past data.

Inside of this index.html we need to add our basic structure
<!DOCTYPE html>
<html>
<head>
    <title>Model Input</title>
</head>
<body>
</body>
</html>
Then we need create our basic form inputs inside the body
<body>
<h1>Enter Model Parameters</h1>
    <form id="modelForm">
    </form>
</body>
Then within this form we add in the inputs of our model that last line here where we have HTML tag input with attribute type set as button is import because browser will render that html as a button and the that onclick call equals submitForm() will trigger some html later in the html.
<body>
<h1>Enter Model Parameters</h1>
    <form id="modelForm">
            <label for="ticker">Ticker:</label>
        <input type="text" id="ticker" name="ticker"><br><br>

        <label for="num_iter">Number of Iterations:</label>
        <input type="number" id="num_iter" name="num_iter"><br><br>

        <label for="dollars">Dollars:</label>
        <input type="number" id="dollars" name="dollars"><br><br>

        <label for="num_months">Number of Months:</label>
        <input type="number" id="num_months" name="num_months"><br><br>

        <input type="button" value="Submit" onclick="submitForm()">
    </form>

<!-- insert  results -->

</body>
Then whatever we input into our model were going to need to return results
so below the inputs in the body tag we need write some divs and set ids these ids are important so flask knows where to return the data
    <!-- Add a div to display the results -->
    <div id="result">
        <h2>Results:</h2>
        <pre id="modelOutput"></pre>
    </div>
Now were going write script tag in html that should be at the bottom of the body tag. In Javascript we write function submitForm() so it matches the onclick attribute. then inside the function we create object call FormData and using html5 we can getElementByID to reference the form above via its id ‘modelForm’.
The data is taken from the form then pasted to object formData
formData is then pasted to the new method called fetch we will need endpoint to send our POST request data We defined its ‘POST’ method and give the body the formData object.
The fetch method is async its waits for a response from the backend .then is used to dictate various outcomes data comes, loads it on specific part of page via the id=”modelOutput” or the request errors.
<!-- Add script tag to trigger the submitForm()  -->
    <script>
        function submitForm() {

        // Create a new FormData object, capturing the data from the form with ID 'modelForm'
        const formData = new FormData(document.getElementById('modelForm'));

        // using the fetch method which is async we can send a POST request
        // to the '/call-model' route or endpoint with the form data
        fetch('/call-model', {
            method: 'POST',
            body: formData
        })

        // Convert the response from the server to JSON format
        // This assumes that the server response is JSON encoded
        .then(response => {
            return response.json();
        })
        .then(data => {

            //here we display the results via HTML element with ID 'modelOutput'
            // JSON.stringify is used to convert the JSON object into a string
            document.getElementById('modelOutput').textContent = JSON.stringify(data, null, 2);
        })
        .catch(error => {
            // If there's an error in the network request or backend its outputted here in console.log
            console.error('Error:', error);
        });
    }
    </script>
Now we go back to app.py t import some more functions that lets load our html
from flask import Flask, render_template, request, jsonifyWe can create our rewrite our / homepage route
@app.route('/')
def hello():
    # here we can past inputs from the frontend to our model
    return render_template('index.html')
We will rewrite a new route called ‘/call-model’
@app.route('/call-model', methods=['POST'])
def call_model_route():
    form_data = request.form
    print(form_data['ticker'])

    # Your logic here, using the form values
    model_result = call_model(API_KEY, form_data)

    return jsonify(model_result)
We can comment out model_result = call_model(API_KEY, form_data) and return “test” as shown below,
@app.route('/call-model', methods=['POST'])
def call_model_route():
    form_data = request.form
    print(form_data['ticker'])

    # Your logic here, using the form values
    # model_result = call_model(API_KEY, form_data)

    return jsonify('test')
then run the flask app local server you should see

You see ‘test’ show up ok so that part was only about passing data from a front-end to back. We still have to pass data from the server to the models so we have to update all the model code.
Here we are going to update the call_model function in the python script model_call.py
The code should look like this
def call_model(API_KEY, form_data):
    # Step 1: Preprocess the messy data
    data_for_model = load_and_preprocess_data(API_KEY, form_data['ticker'])

    # Step 2: we load model and predict & rearrage the data
    new_results = apply_model(data_for_model,
                        form_data['num_iter'],
                        form_data['dollars'],
                        form_data['num_months'])

    # Step 3: Save the organized data to data base
    # output_file_path = r'E:\NittanyAI Projects\Nittany-AI-Rapid-Prototyping-Code\back-end-prototype\results'
    # save_data(new_results, output_file_path)
    return new_results
the form_data object we defined in python when you print(form_data) show look like this
ImmutableMultiDict([('ticker', 'IBM'), ('num_iter', '100'), ('dollars', '100'), ('num_months', '12')])so we can pass specific data points from user input to our model
Always check the other functions you load_and_preprocess_data function should look like this
def load_and_preprocess_data(API_KEY, ticker):

    # Load the data
    data = time_series_fun_monthly(API_KEY, ticker)
    return data  # assuming coords is the preprocessed data
Ok so now that we pasting data to model and getting results back on

Now that works we need to store the results of our API query or calculated results if want to show them later on to users.
Store the results in Supabase PostgreSQL
Supabase is a cloud database as a cloud-based backend to store & retrieve data.

When you got the project create

Then click the gear in the bottom left

then click API

then copy both the project URL and the Project API keys you need this URL to give supabase library code to know which database you are hitting and you need the secret key to access the database to insert and pull data.

then were going to back our .env file and create two new environmental variables

fill in Supabase_url and Supabase_key

we need to pip install supabase
pip install supabase
then in the app.py import statements we going add
from supabase import create_client
it should look like this with the supabase library and import functions from datetime and date. We also need import pytz for timezone database or tz database
import os
from flask import Flask, render_template, request, jsonify
from dotenv import load_dotenv
from flask_cors import CORS
from supabase import create_client
from datetime import datetime, date
import pytz

# Define the timezone, for example, UTC
tz = pytz.timezone('UTC')

from models.model_call import call_model
so it should like this the same way we called Alpha Vantage Key we call Supabase
#Load environment variables
load_dotenv()

# Initialize Flask App
app = Flask(__name__)
# then CORS class is used to wrap the app object to add  CORS headers to all responses from the app
CORS(app)

app.config['DEBUG'] = os.environ.get('DEBUG')

# Import API keys
API_KEY = os.environ.get('API_KEY')
supabase_url = os.getenv("SUPABASE_URL")
supabase_key = os.getenv("SUPABASE_KEY")
then below this code, we have to call function create_client and past
# then below
supabase = create_client(supabase_url, supabase_key)
Then inside the route call_model were going create json structure with data the user made
@app.route('/call-model', methods=['POST'])
def call_model_route():
    form_data = request.form

    # So before we past data to call model we going to same data to supabase
    # we need to structure the data
     data_input = {
        'inserted_at' : datetime.now(tz).isoformat(),
        'updated_at' : datetime.now(tz).isoformat(),
        'username' : 'guest_id',
        'ticker' : form_data['ticker'],
        'investment' : float(form_data['dollars']),
        'months' : form_data['num_months'],
        'iterations' : form_data['num_iter'],
    }

    # Ok then we have to create a schema in supabase

    # Your logic here, using the form values
    model_result = call_model(API_KEY, form_data)

    return jsonify(model_result)
then were going write our schema to match the json structure when you make changes to json structure here or data structure you need to update the database schema.

You should be redirect to the create table page

side bar appears we scroll down.

Then we make columns to match the JSON structure to
   'inserted_at' : datetime.now(tz).isoformat(),
        'updated_at' : datetime.now(tz).isoformat(),
        'username' : 'guest_id',
        'ticker' : form_data['ticker'],
        'investment' : float(form_data['dollars']),
        'months' : form_data['num_months'],
        'iterations' : form_data['num_iter'],
We need to define data types of each column
- So inserted_at is timestamptz
- so updated_at is timestamptz
- so ticker is Text
- so investment is Float8
- so months is Int8
- so iterations is Int8

You should see this

then when you save and you should see this new table

now go back to the VScode below the json structure. We wrap the supabase.table method call in a try statement
    # Ok then we have to create a schema in supabase
    try:
        supabase.table('user_upload').insert(data_input).execute()
    except Exception as e:
        print("An exeption occured", e)
        return jsonify({'insert into database  failed error': str(e)})
were going to start the app locally and submit data into our UI inputs
we click submit and we should see new row of data appear

if you have any errors it could be json structure is mismatched with the schema
Deploy the Flask App Again.
pip freeze > requirements.txtgcloud run deploy --source .Conclusion
Many will say we’re missing lot things here, without a doubt that is true, were missing security features such as JWT, we’re missing input validation, we’re missing user accounts.
However there are many truths in the world & to be honest customers do not care about those things other as much. They want to see the Model-T move forward for the first time, they don’t care how you did it just that you did kickflip or a magic trick.